1 / 0

Excel Graphing

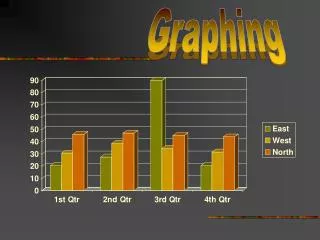
Excel Graphing. Introduction to Excel. Excel is a powerful spreadsheet program which can be used for: Creating graphical displays of data Performing sophisticated data analysis Problem solving Open Excel and follow along as we look through some of the features. Excel Layout. Tool Ribbon.

pancho
Download Presentation

Excel Graphing

An Image/Link below is provided (as is) to download presentation Download Policy: Content on the Website is provided to you AS IS for your information and personal use and may not be sold / licensed / shared on other websites without getting consent from its author. Content is provided to you AS IS for your information and personal use only. Download presentation by click this link. While downloading, if for some reason you are not able to download a presentation, the publisher may have deleted the file from their server. During download, if you can't get a presentation, the file might be deleted by the publisher.

E N D

Presentation Transcript


  1. Excel Graphing

  2. Introduction to Excel Excel is a powerful spreadsheet program which can be used for: Creating graphical displays of data Performing sophisticated data analysis Problem solving Open Excel and follow along as we look through some of the features
  3. Excel Layout Tool Ribbon Formula Bar Note: Save and Print are under the File tab Fill Handle Currently active cell(s): referenced by column and row. Fill Handle
  4. Graphing Graphing data is an important skill for engineers It allows engineers to display data in a visual form to enhance the meaning behind the numbers If not done properly, poor graphing can obscure an important message or confuse the intended audience
  5. Good Graphing Practices Choose an appropriate graph type for the data Excel offers many choices
  6. Good Graphing Practices Every graph must have a title and axis labels. Axes labels must include units. When more than one data set is shown on the same graph, a legend is needed. Graphs must be neat and easily readable. Let’s work on an example…
  7. Example: Current Majors of 1181 Let's conduct a quick survey of everyone in the room. What is your current or proposed major? Let's enter the data into our seed file. How can we present this data graphically?
  8. Step 1: Enter the Data! Left click on cell Enter data Press enter Format the data Highlight data Right click Select format cells
  9. Step 2: Select the Data
  10. Step 3: Create Graph or Chart Click Insert Choose Column as the chart type Choose Clustered Column as the chart sub-type
  11. Step 4: Preview Graph
  12. Step 5: Add a Title Select Layout Tab Select Chart Title Select the desired title location
  13. Step 6: Label Axes (with units!) Select Axis Titles Select Primary Horizontal Axis Title. Enter label. Select Primary Vertical Axis Title. Enter label.
  14. Step 7: Resize and Move the Graph Click on the edge of the graph. Click and drag one of the corners of the graph to adjust the size. Hold shift to prevent distortion. Click and drag the chart area to move the graph.
  15. Done!
  16. Printing the Spreadsheet and Graph Click File Click Print Select appropriate printer When satisfied with the preview, choose Print! Note: If the graph is selected, only the graph will print. Select outside the graph to print both the graph and the data.
  17. Changing the Chart Type Click on the chart Select the Design tab Click Change Chart Type Select new chart type
  18. Chart Type: Pie Chart Is this a good chart to display our data? What are we trying to show?
  19. Formatting Multiple Lines When there are multiple lines on one graph, you need to change the line style to improve clarity. What happens if we print this graph in black & white? What could we do to improve readability?
  20. Changing Line Styles Select the desired line on the graph Select Format Select Shape Outline Select Dashes and choose desired style
  21. Adding Excel Graphs to Word Docs It's easy! Select the graph Right click and select Copy Open the Word document Right click and select Paste
More Related