Download
1 / 38
490 likes | 688 Views
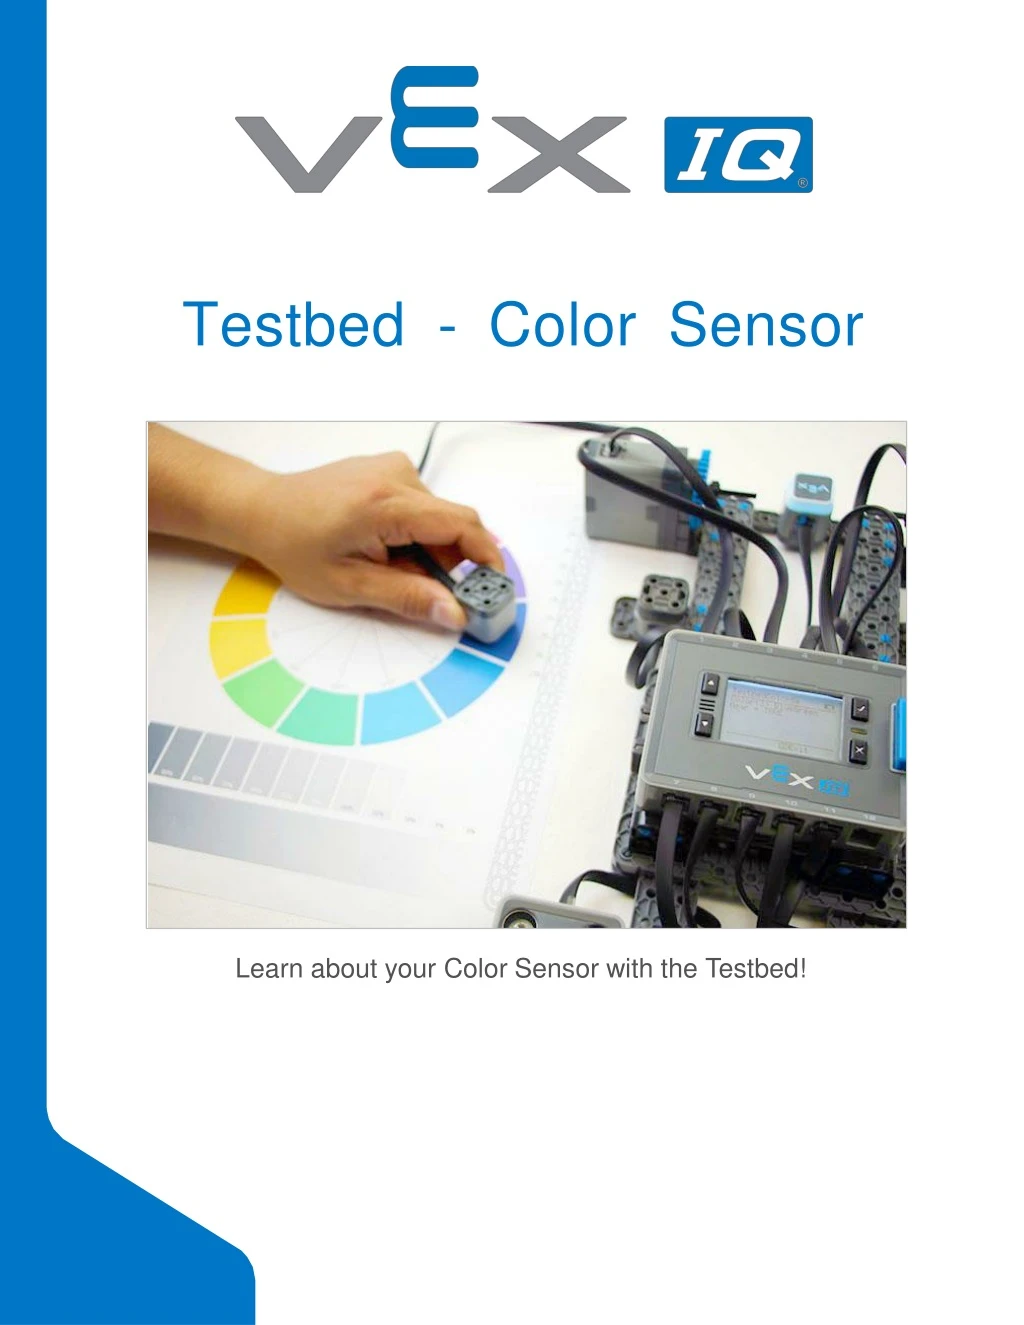
Testbed - Color Sensor. Learn about your Color Sensor with the Testbed!. Discover new hands-on builds and programming opportunities to further your understanding of a subject matter. The Completed Look of the Build. Testbed.

E N D
Testbed - Color Sensor Learn about your Color Sensor with theTestbed!
Discover new hands-on builds and programming opportunities to further your understanding of a subjectmatter.
The Completed Look of the Build Testbed The Testbed build will be used for investigating your SmartDevices.
Build InstructionTips • Steps 1–36: The blue box at the top of the step shows important information for the build. The number above the image of a part is the number of that part required in the step. There may be dimension information below the part to help identify which size touse. • Step 1: Count all pieces before starting your build, including sensors andmotors. • Step 4: Flip the build over after Step 3 to add the blue connector pins asshown. • Step 15: Flip the build over after Step 14 before adding the sensor as shown in thisstep. • Steps 21–26: These steps show you how to put together a single motor sensor group. You will build 4 of these intotal.
ColorSensor228-3012 Description This sensor uses reflected light to detect an objects' color, hue value, grayscale value, and proximity. • Color Sensor228-0312 • CommonUses: • This sensor can be used to detect the color of anobject. • This sensor can be used to detect and/or follow aline. • This sensor can detect whether an object is near or far.
Exploration • Now that you've finished the build and read about what the Color Sensor does, answer these questions in your engineeringnotebook: • You have read that the Color Sensor detects colors and determines whether an object is near or far. It can also be used to follow a line. How do you think the Color Sensor is able to do those things? Focus on at least one of the abilities of the Color Sensor and try to explain how it mightwork. • How would adding a Color Sensor to a robot make itbetter? • Explain the different positions on the robot where the Color Sensor could be attached and the reason(s) for positioning it in those different locations.
Test your build, observe how it functions, and fuel your logic and reasoning skills through imaginative, creative play.
How it Works: Color Sensor There are multiple sensors inside the ColorSensor Detecting Light The Color Sensor actually contains five sensors to detect light of different intensity andcolor. When in grayscale mode, the first sensor is used to detect the intensity of all light in the environment. If more light hits this sensor while it's active, the value sent to the Robot Brain willincrease. There are three sensors which gather light for color detection; one each for red, green, and blue. Using the data collected from these, the Color Sensor calculates what color it's actually seeing. It uses that data to send the Robot Brain the hue or color that itdetects. The final sensor is an infrared sensor-emitter. It shines an invisible light and detects its reflection. If it senses a lot of reflection, it tells the Robot Brain that an object isclose.
Color Sensor Investigation Hardware/SoftwareRequired: 1. Preparing for theInvestigation VEXosUtility
Before beginning the investigation, use the Smart Device Check-up to ensure you have the latest firmware and that your devices are functioning properly. You can leave everything connected to the Testbed as is when updating yourfirmware. Running Program1 Download and run the Testbed - Color Sensor - Color Mode program found in the Hardware/Software requirements table above to your VEX IQ Robot Brain using ROBOTC or Modkit. Color Sensor - ColorMode LCD with Testbed - Color Sensor Color Mode programrunning Look at the LCD on your Robot Brain while the program is running. The program is displaying Color Mode and Proximity information from the Color Sensor on the LCD. Ensure there are no objects or Smart Cables over the Color Sensor that could affect the sensor readings.
4. Sensing the Color Wheel in NormalLighting Color Sensor reading color wheel in normallighting • Make sure that the lighting conditions in your room are normal, with the overhead lights turned on. Slowly move the Color Sensor over each color on the wheel on the Sensor Calibration page. • Which colors on the color wheel most closely match the color names on theLCD? • Which colors on the color wheel are most different from the color names on theLCD? • Move the sensor closer and further away from the color wheel. How does the distance between the sensor and page affect sensorreadings? • How did the lighting affect the colors displayed by the TouchLED? • Record your results in your EngineeringJournal.
5. Sensing the Color Wheel in LowLighting Color Sensor reading color wheel in lowlighting • Darken the lighting conditions in your room by turning the overhead lights off. Slowly move the Color Sensor over each color on the wheel on the Sensor Calibrationpage. • Which colors on the color wheel most closely match the color names on theLCD? • Which colors on the color wheel are most different from the color names on theLCD? • Move the sensor closer and further away from the color wheel. How does the distance between the sensor and page affect sensorreadings? • How did the lighting affect the colors displayed by the TouchLED? • Record your results in your EngineeringJournal.
6. Sensing the Color Wheel in BrightLighting Color Sensor reading color wheel in brightlighting • Brighten the lighting conditions in your room by turning the overhead lights on, and turning the flashlight on facing the Sensor Calibration page. Slowly move the Color Sensor over each color on the wheel on the Sensor Calibrationpage. • Which colors on the color wheel most closely match the color names on theLCD? • Which colors on the color wheel are most different from the color names on theLCD? • Move the sensor closer and further away from the color wheel. How does the distance between the sensor and page affect sensorreadings? • How did the lighting affect the colors displayed by the TouchLED? • Record your results in your EngineeringJournal. 7. Running Program2 Download and run the Testbed - Color Sensor - Grayscale Mode program found in the Hardware/Software requirements table above to your VEX IQ Robot Brain using ROBOTC or Modkit.
8. Color Sensor - GrayscaleMode LCD with Testbed - Color Sensor Grayscale Mode programrunning Look at the LCD on your Robot Brain while the program is running. The program is displaying Grayscale Mode and Proximity information from the Color Sensor on theLCD.
9. Sensing the Grayscale Bar in NormalLighting Color Sensor reading grayscale bar in normallighting • Make sure that the lighting conditions in your room are normal, with the overhead lights turned on. Slowly move the Color Sensor over each grayscale section on the Sensor Calibration page. Please note, the Touch LED is not programmed to light up in the Testbed - Color Sensor - Grayscale program.. • What are the grayscale readings for the darkestsection? • What are the grayscale readings for the brightestsection? • Move the sensor closer and further away from the page. How does the distance between the sensor and page affect sensorreadings? • How did the lighting affect the overall speed of themotor? • Record your results in your EngineeringJournal.
10. Sensing the Grayscale Bar in LowLighting Color Sensor reading grayscale bar in lowlighting • Darken the lighting conditions in your room by turning the overhead lights off. Slowly move the Color Sensor over each grayscale section on the Sensor Calibrationpage. • What are the grayscale readings for the darkestsection? • What are the grayscale readings for the brightestsection? • Move the sensor closer and further away from the page. How does the distance between the sensor and page affect sensorreadings? • How did the lighting affect the overall speed of themotor? • Record your results in your EngineeringJournal.
11. Sensing the Grayscale Bar in BrightLighting Color Sensor reading grayscale bar in brightlighting • Brighten the lighting conditions in your room by turning the overhead lights on, and turning the flashlight on facing the Sensor Calibration page. Slowly move the Color Sensor over each grayscale section on the Sensor Calibration page. • What are the grayscale readings for the darkestsection? • What are the grayscale readings for the brightestsection? • Move the sensor closer and further away from the page. How does the distance between the sensor and page affect sensorreadings? • How did the lighting affect the overall speed of themotor? • Record your results in your EngineeringJournal.
Become a 21st century problem solver by applying the core skills and concepts you learned to other problems.
ColorSensorsintheWorld A calibration tool used to correct color on computerdisplays • Color Sensors • Color sensors are used in many technology applications where having specific colors on displays or products isimportant. • For example: • Color calibration tools check if a digital screen is displaying accurate colors, and then adjust the display settings as needed. This is very helpful for graphics artists and designers who work withcolor. • Cameras and camcorders use color sensors to adjust settings based on the lighting conditions they are in, in order to create better photos and video. These sensors also allow a photographer to focus on specific colors in theirphotos. • Color sensors are sometimes used in manufacturing, to quickly inspect if a product has the correct color quality before it gets shipped to acustomer.
The Value of a Testbed Electronics inspected at atestbed • Testing... One, Two,Three • A testbed is a tool used for simple and repeatable testing of ideas and technology. Testbeds may be comprised of software, hardware, orboth. • Testbeds are used in many different professional fields, and take on many differentforms. • In electronics companies, testbeds can be used to inspect the behavior of new or faulty circuits. • In the automotive industry, "development mules" are used to check the performance and reliability of a new car component in a standard testbedvehicle. • Engine manufacturers use machines called "environmental test chambers" to test how their engines perform over long periods of time, under intense heat and environmental factors.
UsingtheColorSensorin Competition Competition robots picking up different colored gameobjects Color Sensors on yourRobot The VEX IQ Color Sensor has multiple modes, which allow it to capture different types of information from its environment. The information it collects is affected by the lighting conditions of its environment as well as the distance between the sensor and the object or surface it is reading. It is a good practice to test and calibrate the Color Sensor after arriving at a new competition site because the lighting conditions might be different. The information collected by the Color Sensor is useful for programming a competitive robot to respond to a variety of conditions. For example: In a Color Mode, the robot can detect the color of an object near the sensor. This is useful if you want the robot to sort differently colored objects, drive up to a specifically colored object, or detect the color of objects as they pass by thesensor.
In Grayscale Mode, the robot measures how much light it sends out is reflected back into the sensor. This allows your robot to drive until it reaches a line on a surface, or even follow aline. • The Color Sensor also has the ability to tell whether an object or surface is near or far away from the sensor. This is helpful for determining if the robot should drive closer to the object or surface before detecting itscolor.
Is there a more efficient way to come to the same conclusion? Take what you’ve learned and try to improveit.
ImproveandTinkerwithYour Build • Answer the following questions in your engineering notebook as you tinker with thebuild. • Would you like to move the Color Sensor to a different position in this Testbed? If so, where? Would it be mounted in the same way? Would it need to change places with another sensor? Explain with sketches and details how you would like to see the Color Sensor included in thebuild. • Imagine you need to explain to a partner how to make the change. Explain the steps involved in changing the Color Sensor's position by using a detailed procedure with sketches. • Does your plan for moving the Color Sensor improve how well it works, or does it improve the user's experience with the Testbed? Or, does it do both? Explain how the new location of the Color Sensor is an improvement.
Understand the core concepts and how to apply them to differentsituations. This review process will fuel motivation tolearn.
Review • The Color Sensorcan... • Be used to detect the color of anobject • Be used to detect and/or follow aline • Detect whether an object is near orfar • All of the above • True or False : A Testbed is a great way to repeat testing of ideas and technology. • True • False • The Color Sensor uses ultrasonic waves to detect an objects' color, hue value, grayscale value, andproximity. • True • False • Color Sensors are usedin... • Cameras andcamcorders. • Radios. • Computerkeyboards. • All of the above. • Lighting conditions can affect the Color Sensor's ability to detectcolor. • True • False
RemovingConnectorsfrom Beams and Plates Using a pitch shaft to remove a cornerconnector How to Easily RemoveConnectors You can easily remove corner connectors from beams or plates by placing a metal shaft through one of the holes of the corner connector and pulling outward while holding down the beam orplate.
RemovingPinsfromVEXIQ Electronics Removing a 1x1 Connector Pin from a SmartMotor How to Remove Pins that are Stuck inElectronic Components Connector pins can be removed more easily from Smart Motors, sensors, or Robot Brains by using a 1x1 Beam. Push the beam onto the pin and then twist the beam while pulling outward to remove the pin.
RemovingPinsfromVEXIQ Beams and Plates Removing a pin from a plate assembly using abeam How to Easily Remove Pins from Beams andPlates You can quickly remove connector pins from beams or plates by pressing a beam against the back of the pin, which partially pushes the pin out, so you can remove it with your fingers. You can use this technique to more easily remove pins from individual plates and beams, or from builtstructures.
Installing Rubber Shaft Collars Using your hand to warm a Rubber ShaftCollar Rubber Softens as it getsWarm Hold the Rubber Shaft Collars in your hand for 15-30 seconds before you slide them onto a shaft. Holding the Rubber Shaft Collar in your hand will warm and soften the rubber to make it easier to slide onto a shaft.