Download
1 / 34
340 likes | 469 Views
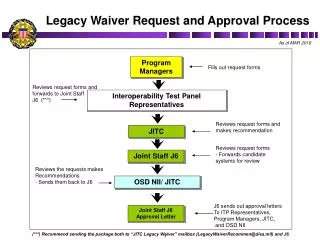
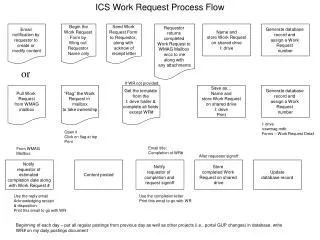
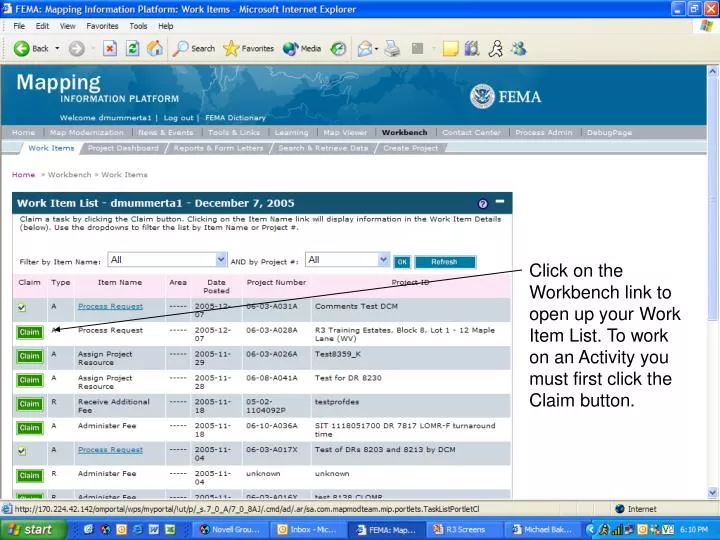
Process Request. Click on the Workbench link to open up your Work Item List. To work on an Activity you must first click the Claim button.

E N D
Process Request Click on the Workbench link to open up your Work Item List. To work on an Activity you must first click the Claim button.
After you click the Claim button for the Activity you want to work on the page will refresh. The Activity Name is now a hyperlink. Click on the hyperlink to begin working on the Activity.
Review the Project Data and revise if necessary. Then click the Continue button.
If the Legal Property Information was not entered previously enter it now. Then click the Continue button.
Review the Main Requestor Mailing Address and revise if necessary. Then click the Continue button.
If any Other Mailing Addresses were entered, review and revise if necessary. Then click the Continue button.
If the Flooding Source was not entered previously it is required in this Activity. Enter the Flooding Source and click the Add Flood Source button.
The page will refresh and the Flooding Source will be in the focus box. Then click the Continue button.
Review the Community Information and revise if necessary. If you need to revise the Community Information, or Map Panel Number, or if any community wide Additional Considerations apply to the project, click the Modify button.
Review the Community and Map Panel Number and revise if necessary.
If any of the community wide Additional Considerations apply to the project click the appropriate boxes and/or enter the appropriate dates.
If the letter will be addressed to the CEO make sure the Yes button is clicked and the contact information is correct. Revise if necessary. Then click the Add Community button.
When the page refreshes scroll down and review the information in the focus box.
If you are processing a LOMR-F, CLOMR-F, or LOMR-FW, the CEO information will be populated. If you know the CEO information needs to be updated or if you suspect it might need to be updated (as is the case here), click the Modify button and enter the appropriate CEO information. Once you have found the updated information and added it you will have to click the Add Community button again to get back to this screen. Then click the Continue button.
Review the Supplementary Data Items and revise if necessary. If you decide that the project is not All Data and that you need to request additional information you’ll need to do that on this screen. You will have to add a new Data Item and indicate that it is not complete and enter the date that you are requesting it. Then click the Continue button.
Enter all applicable lot specific data. Select the appropriate Outcome from the dropdown.
PLEASE NOTE – If you are processing a Potential Violation or an Other Response (e.g. Alluvial Fan case) you must select No Outcome (Other response or violation) from the Outcome dropdown.
Continue entering the lot specific data and any appropriate comments.
Select the appropriate Additional Considerations by clicking the associated box.
When the page refreshes scroll down to review the lot specific data.
Continue to scroll down to review the Additional Considerations that were selected for the lot. Repeat the process for each lot in the project. Then click the Continue button.
Select the appropriate letter from the Letter Type dropdown.
Leave the Letter Date field empty if you selected any letter other than the Request Additional Data/Fee letter. If you selected the Request Additional Data/Fee letter you’ll have to enter the Letter Date. Click Add Letter.
When the page refreshes scroll down to review the letter summary and then click the Continue button.
This is a new screen that will capture the Property Description and Determination codes that will show up on the Docket for the project. The Property Description can be the Subdivision Name, the Street Address of the property, or some other descriptive text, e.g. “Portion of Section 32, R19W, T3N, M.D.B. & M.”. For Determination enter all unique determination codes. For instance, if the project is removing one structure and three structures are denied, the unique determination codes would be 70-RS and 70-NS. Separate codes with commas. Then click the Continue button.
On this screen click the Expand All link to see all of the case specific data and verify that it is accurate before you complete the activity.
Scroll down to review all of the information that has been entered for the project.
To finish this Activity click the Complete Task button. Once you click the Complete Task button the Project will move to the next Activity in the Workflow and you will not be able to edit any of the information you entered.
After clicking the Complete Task button you’ll need to click the Maximize button to see your Work Item List.
When your Work Item List loads click the Refresh button to see if there are any new Activities.